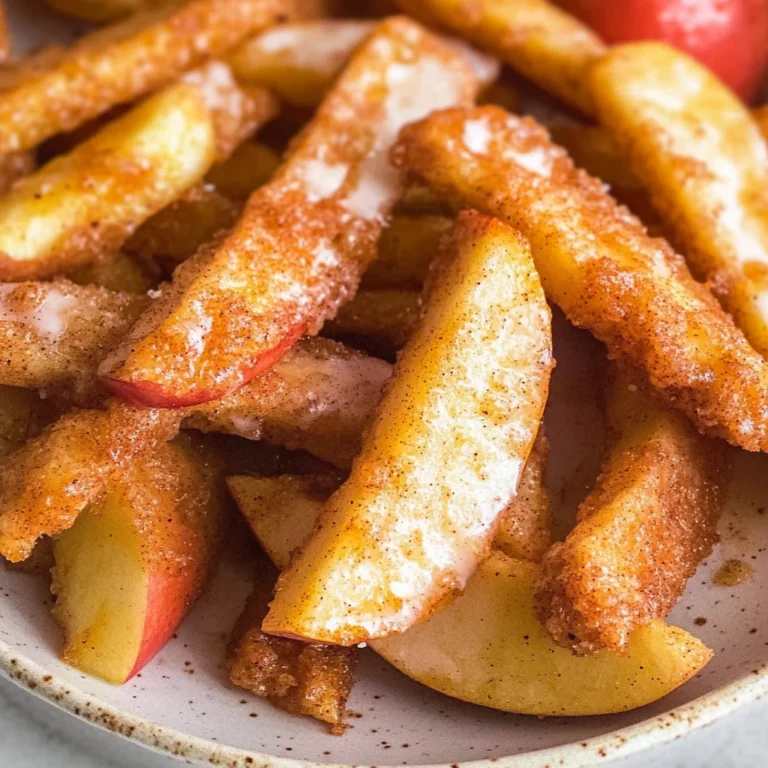
Homemade Apple Pie Filling
If you’re looking for the perfect way to elevate your desserts, you’ve come to the right place! This Homemade Apple Pie Filling is truly a game-changer. Whether you’re whipping up a classic apple pie, creating delicious turnovers, or simply spooning it over vanilla ice cream, this recipe has got you covered. It’s a beloved family recipe of mine that always brings back warm memories of cozy gatherings and sweet aromas wafting through the kitchen.
This filling is not just easy to make; it’s also incredibly versatile. You can use it for special occasions or even on busy weeknights when you want something comforting and delightful. Trust me, once you try this Homemade Apple Pie Filling, you’ll never look back!
Why You’ll Love This Recipe
- Quick and Easy: This recipe takes just 15 minutes of prep time, making it perfect for any day.
- Family-Friendly: Everyone loves the classic taste of homemade apple pie filling—it’s a guaranteed hit!
- Make-Ahead Friendly: Prepare it in advance, can it, or freeze it for later use—great for meal prep!
- Versatile Ingredient: Use this filling in pies, tarts, or as a topping for pancakes and waffles.
- Delicious Flavor: The combination of cinnamon and nutmeg makes every bite feel like a warm hug.
Ingredients You’ll Need
This Homemade Apple Pie Filling uses simple and wholesome ingredients that are likely already in your pantry. Here’s what you’ll need:
Fresh Apples
- 9 cups fresh apples, peeled, cored, and chopped into uniform sizes
Sweeteners
- 2 tablespoons lemon juice
- 3 cups white sugar
- 2 tablespoons brown sugar
Thickeners & Spices
- 1/2 cup cornstarch
- 1 teaspoon ground cinnamon
- 1/2 teaspoon ground nutmeg
- 1/2 teaspoon coarse sea salt
Variations
One of the best things about this recipe is its flexibility! Feel free to get creative with these fun variations:
- Add Some Zest: A tablespoon of orange zest can brighten the flavors.
- Go Nutty: Toss in some chopped walnuts or pecans for added texture.
- Sweeten the Deal: Experiment with different sweeteners like honey or maple syrup.
- Fruit Medley: Mix in other fruits like pears or cranberries for a delicious twist.
How to Make Homemade Apple Pie Filling
Step 1: Prepare the Apples
In a large bowl, toss the peeled, cored, and chopped fresh apples with the lemon juice. This step is crucial because lemon juice prevents the apples from browning while they sit. It’s an easy way to ensure your filling looks as good as it tastes!
Step 2: Make the Sauce
In a large Dutch oven or saucepan, stir together the white sugar, brown sugar, cornstarch, ground cinnamon, ground nutmeg, and coarse sea salt. Add 4 cups of water and bring everything to a low simmer. This mixture creates a delightful sauce that will coat our apples beautifully.
Step 3: Combine Everything
Stir in your prepared apples into the simmering sauce. Cover the pot and cook for about 6-10 minutes depending on how large your apple pieces are. The key here is to ensure that your apples are tender but still hold their shape. When they pierce easily with a fork and the sauce thickens nicely, you know you’re on track!
Step 4: Cool Down
Once cooked, remove from heat and allow your filling to cool down completely. This step is important because it helps develop all those wonderful flavors!
Step 5: Store or Use
You can use this delicious filling right away or store it for later use! It’s perfect for canning or freezing—just make sure it’s cooled first so it doesn’t affect storage quality.
If you’ve tried this recipe, I’d love to hear how it went! Come back and let us know in the comments or ratings!
Pro Tips for Making Homemade Apple Pie Filling
Making your own apple pie filling can be a rewarding experience, and these pro tips will help you achieve the best results!
-
Choose the Right Apples: Select a mix of tart and sweet apples, such as Granny Smith and Honeycrisp, to create a well-balanced flavor that enhances your pie.
-
Uniform Sizing: Cut your apples into uniform sizes to ensure even cooking. This prevents some pieces from becoming mushy while others remain firm, giving you a delightful texture throughout.
-
Adjust Sweetness: Feel free to adjust the sugar levels according to your taste or the sweetness of your apples. This customization allows you to create a filling that perfectly suits your palate.
-
Thickening Agent: Cornstarch is an excellent thickener, but if you prefer a different consistency, consider using arrowroot powder or tapioca starch for a gluten-free option.
-
Cool Before Storing: Let the apple filling cool completely before canning or freezing. This prevents condensation from forming, which can lead to ice crystals and affect the texture when thawed.
How to Serve Homemade Apple Pie Filling
Once you’ve prepared this delicious homemade apple pie filling, it’s time to think about how to serve it. With its sweet and spicy flavors, it pairs wonderfully with various dishes and garnishes!
Garnishes
-
Whipped Coconut Cream: A dollop of whipped coconut cream adds a light and airy texture that complements the richness of the apple filling without being too heavy.
-
Cinnamon Sugar Dusting: A sprinkle of cinnamon sugar on top just before serving can enhance the warm spices in the filling and provide an inviting aroma.
Side Dishes
-
Vanilla Ice Cream: The classic pairing! A scoop of vanilla ice cream melting over warm apple pie filling creates a delightful contrast in temperature and flavor.
-
Oatmeal Pancakes: Serve the apple pie filling over fluffy oatmeal pancakes for a unique breakfast treat that brings comfort food vibes any time of day.
-
Cheddar Biscuits: The savory notes of cheddar biscuits make for an excellent side dish. Their crumbly texture beautifully balances out the sweetness of the apples.
-
Caramel Sauce Drizzle: For an indulgent touch, drizzle some homemade or store-bought caramel sauce over the apple pie filling. It adds richness and depth while making each bite feel special.
With these presentation ideas and tips, you’re all set to enjoy your homemade apple pie filling in delightful ways!
Make Ahead and Storage
This Homemade Apple Pie Filling is perfect for meal prep! You can easily make a big batch in advance, ensuring you have delicious filling on hand whenever the craving strikes.
Storing Leftovers
- Store any leftover apple pie filling in an airtight container.
- Refrigerate for up to one week.
- Make sure to cool the filling completely before sealing it to avoid condensation.
Freezing
- Divide the filling into portions suitable for your future baking needs.
- Use freezer-safe bags or containers, removing as much air as possible.
- Freeze for up to six months. Label with the date for reference!
Reheating
- Thaw overnight in the refrigerator before using.
- To reheat, place in a saucepan over medium heat, stirring occasionally until warmed through.
- Alternatively, microwave in short intervals, stirring in between, until heated evenly.
FAQs
Here are some common questions about Homemade Apple Pie Filling that you might find helpful!
Can I use different types of apples for my homemade apple pie filling?
Absolutely! Different apple varieties like Granny Smith, Honeycrisp, or Fuji can add unique flavors and textures. Just aim for a mix of sweet and tart apples for the best balance!
How long does homemade apple pie filling last in the fridge?
Homemade apple pie filling will last about one week when stored properly in an airtight container in the refrigerator. Just make sure it’s cooled completely before sealing!
Can I use this homemade apple pie filling for other desserts?
Yes! This delicious homemade apple pie filling is versatile. Use it for tarts, crumbles, or even as a topping for pancakes and waffles.
What’s the best way to freeze homemade apple pie filling?
For freezing, divide your homemade apple pie filling into portions and store them in freezer-safe containers or bags. It can be frozen for up to six months—just remember to label them with the date!
Final Thoughts
I truly hope you enjoy making this Homemade Apple Pie Filling as much as I do! It’s a classic recipe that’s not only simple but also brings warmth and comfort to any dessert. Whether you’re whipping up a quick weeknight treat or preparing something special for guests, this filling will surely impress. Get ready to savor every bite, and happy baking!
Homemade Apple Pie Filling

Elevate your dessert game with this easy Homemade Apple Pie Filling! Perfect for filling pies, creating delicious turnovers, or drizzling over vanilla ice cream, this recipe is a must-have for any home baker. It combines fresh apples with warm spices like cinnamon and nutmeg, resulting in a comforting and nostalgic flavor that evokes cozy gatherings. Quick to prepare and versatile enough for any occasion, this filling will become a staple in your kitchen. Whether you make it in advance for meal prep or whip it up on a busy weeknight, each bite promises to be a delightful treat.
- Prep Time: 15 minutes
- Cook Time: 10 minutes
- Total Time: 25 minutes
- Yield: Approximately 8 servings 1x
- Category: Dessert
- Method: Cooking
- Cuisine: American
Ingredients
- 9 cups fresh apples, peeled, cored, and chopped
- 2 tablespoons lemon juice
- 3 cups white sugar
- 2 tablespoons brown sugar
- 1/2 cup cornstarch
- 1 teaspoon ground cinnamon
- 1/2 teaspoon ground nutmeg
- 1/2 teaspoon coarse sea salt
Instructions
- In a large bowl, toss the chopped apples with lemon juice to prevent browning.
- In a Dutch oven, combine white sugar, brown sugar, cornstarch, cinnamon, nutmeg, and sea salt. Stir in 4 cups of water and bring to a low simmer.
- Add the prepared apples to the sauce and cook covered for 6-10 minutes until tender but firm.
- Remove from heat and let cool completely before using or storing.
Nutrition
- Serving Size: 120g
- Calories: 210
- Sugar: 40g
- Sodium: 5mg
- Fat: 0g
- Saturated Fat: 0g
- Unsaturated Fat: 0g
- Trans Fat: 0g
- Carbohydrates: 53g
- Fiber: 3g
- Protein: <1g
- Cholesterol: 0mg