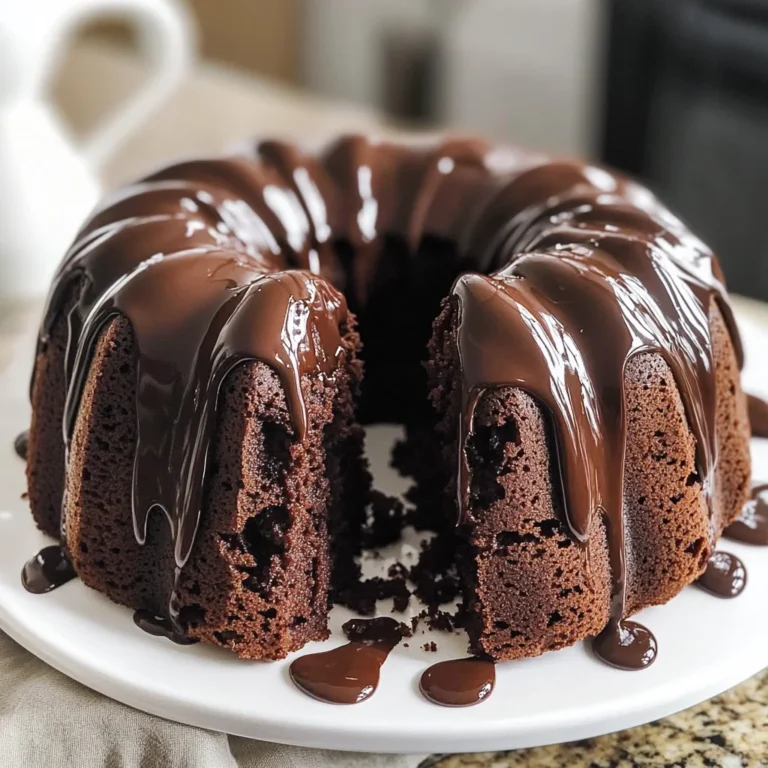
Reese’s Peanut Butter Earthquake Cake
If you’re looking for a dessert that brings smiles and satisfied sighs, let me introduce you to my favorite indulgence: Reese’s Peanut Butter Earthquake Cake! This cake is a glorious combination of rich chocolate and creamy peanut butter, creating a delightful treat that’s perfect for any occasion. Whether you’re celebrating a birthday, hosting a family gathering, or just satisfying a sweet tooth on a busy weeknight, this cake will surely steal the show.
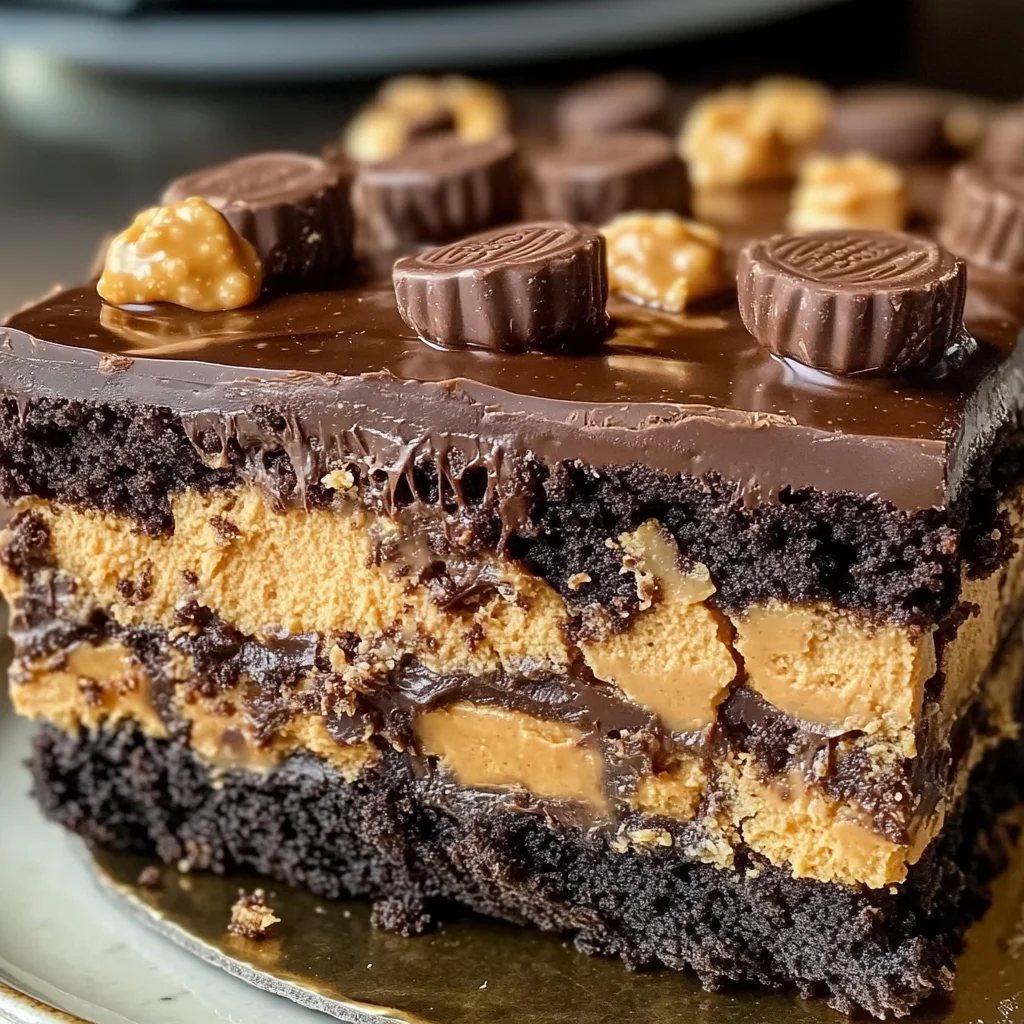
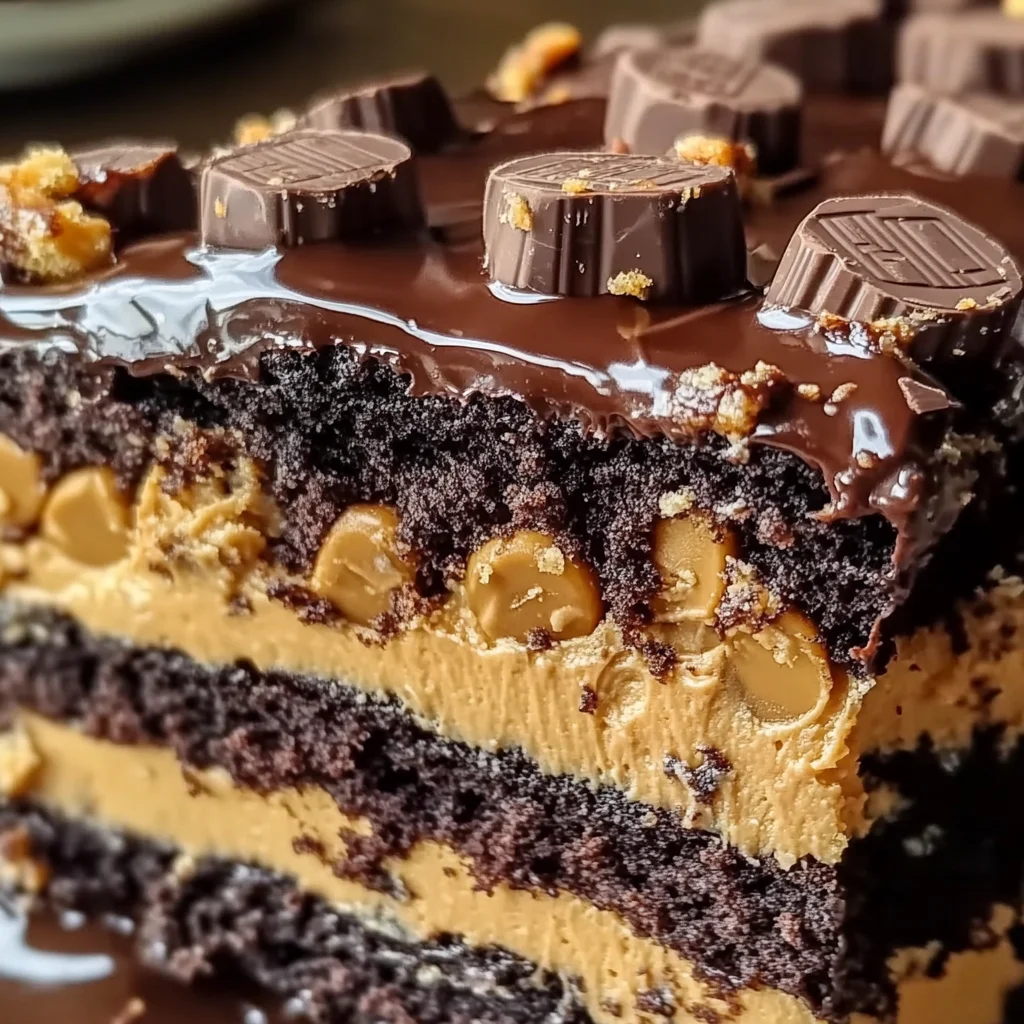
What makes this dessert so special? It’s the gooey, layered center filled with peanut butter goodness and topped with crunchy Reese’s cups. This recipe is not just easy to make; it’s also incredibly forgiving. You can whip it up in no time and enjoy warm or at room temperature. Trust me; no one will be able to resist!
Why You’ll Love This Recipe
- Decadent Flavor: The combination of chocolate and peanut butter is simply irresistible.
- Easy Preparation: With just a few simple steps, you can create this delicious cake without breaking a sweat.
- Family-Friendly: Kids and adults alike will love this treat—perfect for sharing!
- Versatile Dessert: Serve it warm with ice cream or at room temperature; it’s delicious either way.
- Make-Ahead Convenience: Bake it in advance for parties or gatherings—it tastes great even after a day!
Ingredients You’ll Need
Gathering your ingredients is half the fun! For this Reese’s Peanut Butter Earthquake Cake, you’ll need some simple and wholesome items that you may already have in your pantry. Let’s take a look:
- 1 box chocolate cake mix
- 1 cup water
- 1/2 cup vegetable oil
- 3 large eggs
- 1 cup creamy peanut butter
- 8 oz cream cheese, softened
- 1/2 cup unsalted butter, melted
- 4 cups powdered sugar
- 1 tsp vanilla extract
- 1 cup Reese’s Peanut Butter Cups, chopped
Variations
This recipe is wonderfully flexible, allowing you to customize it to your taste! Here are some fun variations to consider:
- Add Nuts: Toss in some chopped peanuts for an extra crunch.
- Use Dark Chocolate: Swap out the chocolate cake mix for dark chocolate for an even richer flavor.
- Mix in Other Candies: Stir in other favorite candies like M&M’s or Snickers for unique twists.
- Make It Gluten-Free: Use gluten-free chocolate cake mix to accommodate dietary needs.
How to Make Reese’s Peanut Butter Earthquake Cake
Step 1: Preheat the Oven
Start by preheating your oven to 350°F (175°C). Greasing your baking dish ensures that your cake comes out easily after baking. A well-greased dish helps create those lovely edges we all love!
Step 2: Prepare the Cake Batter
In a large bowl, mix the chocolate cake mix, water, vegetable oil, and eggs until everything is combined smoothly. Pour this luscious batter into the greased baking dish. This step lays the foundation for our decadent dessert!
Step 3: Make the Peanut Butter Mixture
In another bowl, combine the creamy peanut butter, softened cream cheese, melted butter, powdered sugar, and vanilla extract. Mix until smooth and dreamy. This mixture adds that gooey layer of goodness right in the middle of your cake.
Step 4: Swirl It Together
Drop spoonfuls of the peanut butter mixture over the chocolate batter. Use a knife to gently swirl it together. Don’t worry about being perfect; those swirls create beautiful pockets of deliciousness as they bake!
Step 5: Add Some Crunch
Sprinkle the chopped Reese’s Peanut Butter Cups evenly over the top of your batter. These little treats will melt slightly while baking, adding even more flavor and texture.
Step 6: Bake Away!
Bake your cake for about 35-40 minutes or until a toothpick inserted into the center comes out mostly clean. Just keep an eye on it—this cake should be moist but not gooey all through!
Step 7: Cool & Enjoy
Allow your Reese’s Peanut Butter Earthquake Cake to cool slightly before serving. Enjoy it warm or at room temperature—either way, it’s going to be a hit! Grab a fork and dig into this delightful treat that everyone will love!
Pro Tips for Making Reese’s Peanut Butter Earthquake Cake
Creating the perfect Reese’s Peanut Butter Earthquake Cake is all about those little details that make a big difference. Here are some pro tips to ensure your cake turns out delicious every time:
-
Use room temperature ingredients: Bringing your eggs and cream cheese to room temperature helps them blend seamlessly into the batter, resulting in a smoother texture.
-
Don’t overmix the batter: Mixing just until combined prevents the cake from becoming tough, keeping it soft and fluffy.
-
Check for doneness carefully: Since ovens can vary, keep an eye on your cake during the last few minutes of baking. A toothpick should come out mostly clean but not completely dry, indicating a moist cake.
-
Serve it warm: This cake is at its best when served slightly warm, allowing the gooey center to shine through and enhancing the peanut butter flavor.
-
Store leftovers properly: If you have any leftovers (which is rare!), store them in an airtight container at room temperature for up to 2 days or refrigerate for up to a week. This keeps the cake fresh and delicious!
How to Serve Reese’s Peanut Butter Earthquake Cake
Serving your Reese’s Peanut Butter Earthquake Cake can elevate its indulgent experience even further! Here are some delightful ideas on how to present this sweet treat:
Garnishes
- Whipped coconut cream: A dollop of whipped coconut cream adds a light, airy touch that balances the richness of the cake.
- Chocolate syrup drizzle: Drizzling chocolate syrup over each slice not only enhances the visual appeal but also intensifies the chocolate flavor.
- Chopped peanuts: Sprinkling some chopped peanuts on top provides a crunchy texture that complements the softness of the cake.
Side Dishes
- Vanilla ice cream: The classic pairing of vanilla ice cream with warm chocolate cake creates a delightful contrast in temperatures and flavors.
- Fresh berries: A side of fresh strawberries or raspberries adds a fruity brightness that cuts through the richness of the cake.
- Coffee or tea: Serving a cup of coffee or herbal tea alongside your dessert can enhance its flavors while providing a comforting beverage option.
- Caramel sauce: For an extra touch of sweetness, consider offering caramel sauce as a dip or drizzle alongside each slice.
With these serving suggestions, your Reese’s Peanut Butter Earthquake Cake will be sure to impress friends and family alike! Enjoy every decadent bite!
Make Ahead and Storage
This Reese’s Peanut Butter Earthquake Cake is perfect for meal prep, allowing you to enjoy a delightful dessert over several days. Here’s how to store it and keep it fresh!
Storing Leftovers
- Store any leftover cake in an airtight container at room temperature for up to 3 days.
- If you prefer, you can refrigerate the cake for up to a week; just ensure it’s well covered to maintain moisture.
Freezing
- To freeze the cake, wrap individual slices tightly in plastic wrap and then place them in a freezer-safe bag.
- The cake can be frozen for up to 3 months. Just make sure to label the bag with the date!
Reheating
- For best results, reheat individual slices in the microwave for about 15-20 seconds, or until warmed through.
- Alternatively, you can warm it in the oven at 350°F (175°C) for about 10 minutes if you’re reheating multiple pieces.
FAQs
Here are some common questions about this delicious dessert that might help you out!
How does Reese’s Peanut Butter Earthquake Cake get its name?
The name Earthquake Cake comes from the way the peanut butter mixture swirls into the chocolate batter, creating a marbled effect that resembles cracks or earthquakes throughout the cake.
Can I use crunchy peanut butter in Reese’s Peanut Butter Earthquake Cake?
Yes! You can substitute crunchy peanut butter for creamy if you prefer some texture in your cake. It will add a delightful crunch to each bite.
What should I serve with Reese’s Peanut Butter Earthquake Cake?
This indulgent cake pairs wonderfully with a scoop of vanilla ice cream or whipped coconut cream for an extra special treat!
Is there a way to make Reese’s Peanut Butter Earthquake Cake gluten-free?
Definitely! You can use a gluten-free chocolate cake mix as a substitute for the regular one while following all other steps as directed.
Final Thoughts
I hope this Reese’s Peanut Butter Earthquake Cake brings joy to your kitchen and adds sweetness to your gatherings! It’s such a fun and indulgent treat that everyone will love. Enjoy making it and savoring every gooey bite. I can’t wait for you to try this recipe—happy baking!
Reese’s Peanut Butter Earthquake Cake

Indulge in the joy of baking with this decadent Reese’s Peanut Butter Earthquake Cake—a delightful fusion of rich chocolate and creamy peanut butter guaranteed to satisfy your sweet cravings. This easy-to-make dessert features a gooey center filled with luscious peanut butter goodness, while crunchy Reese’s cups add the perfect finishing touch. Whether you’re hosting a family gathering, celebrating a special occasion, or simply treating yourself after a long day, this cake is sure to steal the spotlight and bring smiles to everyone’s faces!
- Prep Time: 15 minutes
- Cook Time: 40 minutes
- Total Time: 55 minutes
- Yield: About 12 servings 1x
- Category: Dessert
- Method: Baking
- Cuisine: American
Ingredients
- 1 box chocolate cake mix
- 1 cup water
- 1/2 cup vegetable oil
- 3 large eggs
- 1 cup creamy peanut butter
- 8 oz cream cheese, softened
- 1/2 cup unsalted butter, melted
- 4 cups powdered sugar
- 1 tsp vanilla extract
- 1 cup chopped Reese’s Peanut Butter Cups
Instructions
- Preheat your oven to 350°F (175°C) and grease a baking dish.
- In a large bowl, combine the chocolate cake mix, water, vegetable oil, and eggs. Mix until smooth and pour into the prepared dish.
- In another bowl, blend the creamy peanut butter, softened cream cheese, melted butter, powdered sugar, and vanilla extract until smooth.
- Spoon the peanut butter mixture over the chocolate batter and swirl together with a knife.
- Sprinkle the chopped Reese’s Peanut Butter Cups on top.
- Bake for 35-40 minutes or until a toothpick comes out mostly clean.
- Allow to cool slightly before serving warm or at room temperature.
Nutrition
- Serving Size: 1 serving
- Calories: 450
- Sugar: 45g
- Sodium: 250mg
- Fat: 24g
- Saturated Fat: 10g
- Unsaturated Fat: 12g
- Trans Fat: 0g
- Carbohydrates: 55g
- Fiber: 2g
- Protein: 7g
- Cholesterol: 70mg