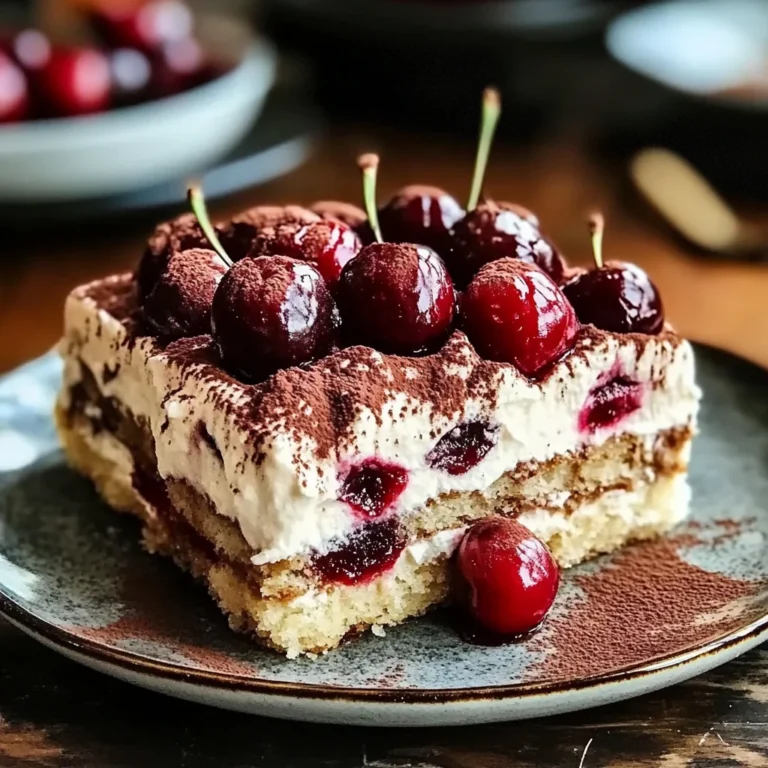
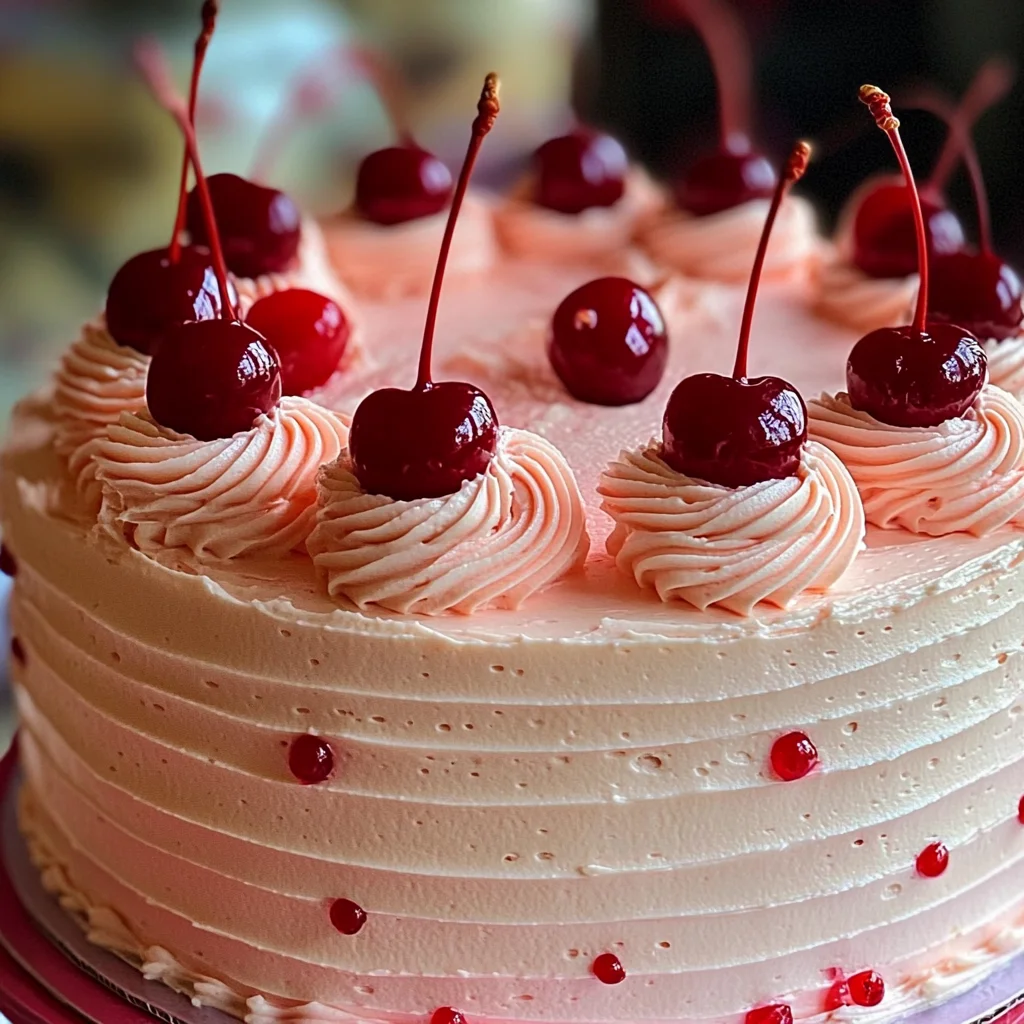
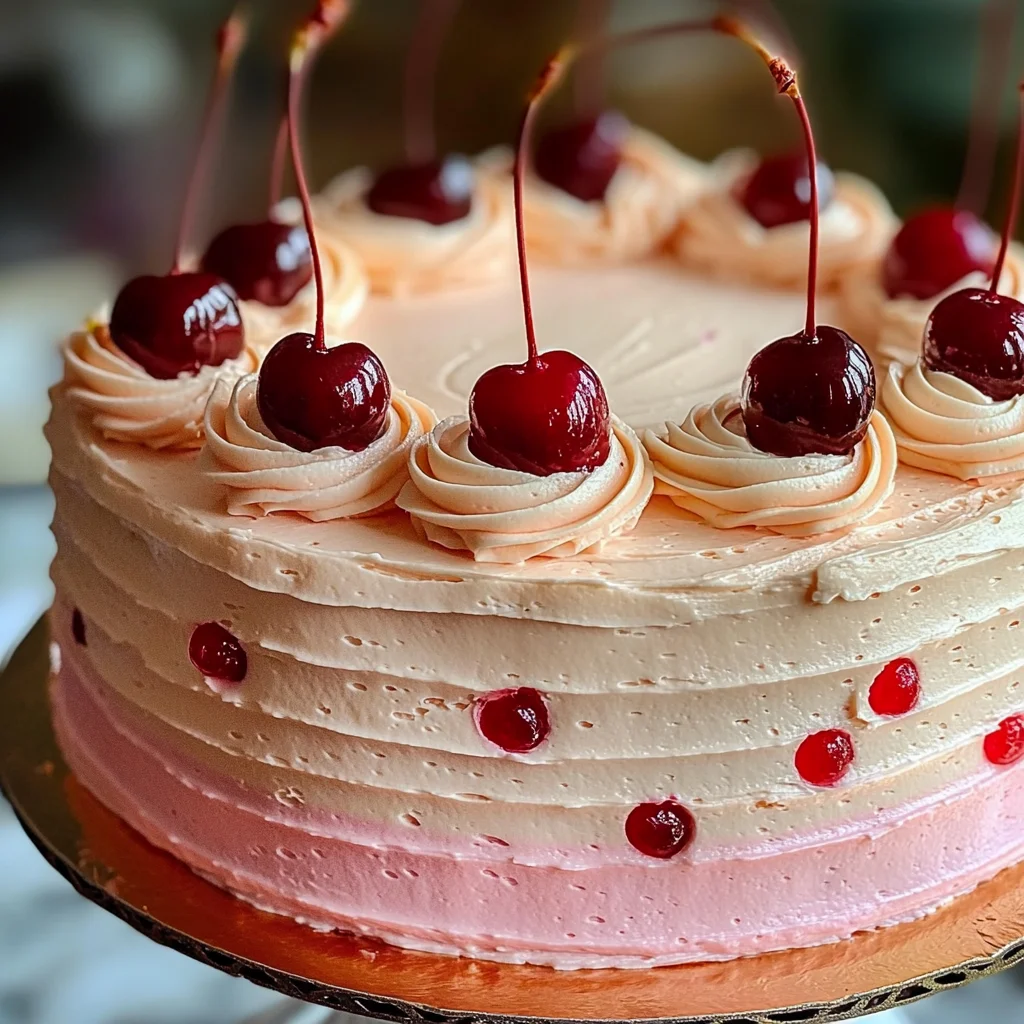
Vintage Maraschino Cherry Cake
If you’re looking for a cake that brings back fond memories and makes any gathering special, look no further than this Vintage Maraschino Cherry Cake! It’s not just a dessert; it’s a slice of nostalgia. With its soft pink color and the sweet pop of maraschino cherries, this cake is perfect for birthdays, family gatherings, or even a cozy treat after dinner. Everyone will be delighted when they see (and taste!) this lovely cake.
This recipe combines simple ingredients with a delightful flavor, making it an easy yet impressive choice. Trust me; once you bake this cake, it will quickly become a favorite in your household!
Why You’ll Love This Recipe
- Nostalgic Flavor: The sweet maraschino cherries bring back memories of childhood treats and family celebrations.
- Easy to Make: With straightforward steps, this cake is perfect for bakers of all levels.
- Family-Friendly: Kids love the sweet cherry flavor, making it a hit with everyone at the table.
- Beautiful Presentation: The pink hue and cherry garnish make it visually appealing for any occasion.
- Versatile Treat: Perfect for parties, holidays, or simply when you want to indulge in something special.
Ingredients You’ll Need
Making this Vintage Maraschino Cherry Cake is as easy as pie—well, easier than pie! You only need some simple and wholesome ingredients that you might already have in your pantry. Let’s gather what you’ll need:
For the Cake
- 2 ½ cups all-purpose flour
- 2 ½ teaspoons baking powder
- ½ teaspoon salt
- ¾ cup unsalted butter, softened
- 1 ¾ cups granulated sugar
- 4 large eggs
- ½ cup maraschino cherry juice
- ½ cup milk
- 2 teaspoons vanilla extract
- ¾ cup maraschino cherries, chopped
For the Frosting
- 1 cup unsalted butter, softened
- 4 cups powdered sugar
- 2 tablespoons maraschino cherry juice
- 1 teaspoon vanilla extract
- 2 tablespoons milk (if needed for consistency)
- Whole maraschino cherries for garnish
Variations
One of the best things about this recipe is its flexibility! You can easily switch things up to make it your own. Here are a few fun ideas:
- Add nuts: Chopped walnuts or pecans can add a lovely crunch to the cake.
- Swap the cherries: Try using fresh cherries or other fruits like raspberries for a different twist.
- Frosting flavors: Experiment with almond extract instead of vanilla in the frosting for a unique taste.
- Decorate differently: Use colorful sprinkles or edible flowers to brighten up your cake’s presentation.
How to Make Vintage Maraschino Cherry Cake
Step 1: Preheat & Prepare Pans
Preheat your oven to 350°F (175°C). This step is crucial because having a hot oven ensures that your cakes rise beautifully. Grease and flour two 9-inch round cake pans or line them with parchment paper so that they come out easily after baking.
Step 2: Mix Dry Ingredients
In a medium bowl, whisk together the flour, baking powder, and salt. Whisking helps aerate the mixture and ensures even distribution of the leavening agent. Set this aside while we focus on creating our batter.
Step 3: Cream Butter & Sugar
In a large mixing bowl, beat the softened butter and granulated sugar together until light and fluffy. This process incorporates air into the mixture, which will help give your cake its soft texture.
Step 4: Add Eggs & Flavorings
Beat in the eggs one at a time. This is important because adding them separately allows each egg to fully incorporate into the batter. Next, mix in the vanilla extract and maraschino cherry juice until well combined—this will infuse that delicious cherry flavor throughout!
Step 5: Incorporate Dry Ingredients & Milk
Gradually add the dry ingredients in three parts while alternating with milk. Mixing just until combined keeps your cake light and fluffy—overmixing can lead to a dense texture.
Step 6: Fold in Cherries
Gently fold in the chopped maraschino cherries into your batter. This step adds bursts of sweetness throughout each bite of your gorgeous cake.
Step 7: Bake the Cakes
Divide the batter evenly between your prepared pans. Bake them for 25-30 minutes or until a toothpick inserted into the center comes out clean. Keep an eye on them toward the end of baking!
Step 8: Cool Completely
After baking, let your cakes cool in their pans for about 10 minutes before transferring them to a wire rack to cool completely. This cooling step is important; it allows moisture to escape from the cakes and prevents sogginess.
Step 9: Prepare the Frosting
While waiting for your cakes to cool down completely, beat the softened butter until creamy in another mixing bowl. Gradually add powdered sugar until smooth—this creates that luscious texture we’re aiming for! Then mix in more maraschino cherry juice and vanilla extract until fully combined.
Step 10: Assemble & Decorate
Once cooled, spread frosting over one layer of cake before placing another layer on top. Frost the entire cake generously! Finish off by garnishing with whole maraschino cherries for that classic vintage look.
Now you’re all set to enjoy every slice of this delightful Vintage Maraschino Cherry Cake! Happy baking!
Pro Tips for Making Vintage Maraschino Cherry Cake
Making the perfect Vintage Maraschino Cherry Cake can be a delightful experience, and a few pro tips will help elevate your baking game!
-
Use Room Temperature Ingredients: Make sure your butter, eggs, and milk are at room temperature. This ensures a smoother batter and helps the ingredients mix more thoroughly for a tender cake.
-
Don’t Overmix: When combining the dry ingredients with the wet ingredients, mix just until combined. Overmixing can lead to a denser cake, so be gentle!
-
Check Oven Temperature: Keep an eye on your oven’s actual temperature with an oven thermometer. Ovens can vary widely, and baking at the right temperature is crucial for achieving that perfect rise.
-
Experiment with Frosting Consistency: If your frosting is too thick, add a little more milk until you reach your desired spreadability. A smooth frosting layers beautifully on the cake!
-
Make It Ahead of Time: This cake tastes even better the next day as flavors meld together. Consider baking it a day in advance and storing it in an airtight container.
How to Serve Vintage Maraschino Cherry Cake
Serving this beautiful cake is just as much fun as making it! Here are some delightful ideas to present your Vintage Maraschino Cherry Cake.
Garnishes
- Fresh Mint Leaves: A few sprigs of fresh mint add a vibrant color contrast and a refreshing aroma to each slice.
- Chocolate Shavings: Lightly sprinkle some chocolate shavings over the frosting for an elegant touch that complements the sweetness of the cherries.
- Powdered Sugar Dusting: A light dusting of powdered sugar adds a touch of sophistication, making each slice look like it came from a bakery.
Side Dishes
- Vanilla Ice Cream: Creamy vanilla ice cream pairs perfectly with the sweet cherry flavors of the cake, adding a cool contrast that enhances every bite.
- Fruit Salad: A light fruit salad made with seasonal fruits provides a refreshing balance to the rich flavors of the cake, making it a delightful accompaniment.
- Coffee or Tea: Offering freshly brewed coffee or tea alongside your cake enhances its sweetness and provides a warm beverage option for guests.
- Whipped Cream: Lightly sweetened whipped cream can be served on the side or dolloped on top for those who love an extra creamy texture with their dessert.
Enjoy your baking adventure and treat yourself to this charming Vintage Maraschino Cherry Cake! Each slice is sure to bring smiles and nostalgia to any gathering.
Make Ahead and Storage
This Vintage Maraschino Cherry Cake is not only a delightful treat but also perfect for meal prep! You can make it ahead of time and enjoy it at your leisure. Here’s how to store and manage your delicious creation.
Storing Leftovers
- Store leftover cake in an airtight container at room temperature for up to 3 days.
- If you prefer, refrigerate the cake to extend its freshness for up to a week.
- Allow the cake to come to room temperature before serving for the best flavor and texture.
Freezing
- Wrap the cooled cake layers tightly in plastic wrap or aluminum foil.
- Place them in a freezer-safe bag or container, ensuring all air is removed.
- Freeze for up to 3 months. Thaw in the refrigerator overnight before serving.
Reheating
- If you prefer your cake warm, you can reheat slices in the microwave for about 15-20 seconds.
- Alternatively, warm individual slices in a toaster oven at low heat until just heated through.
FAQs
Here are some common questions about the Vintage Maraschino Cherry Cake that might help you out!
Can I use other types of cherries instead of maraschino cherries?
While maraschino cherries give this Vintage Maraschino Cherry Cake its distinct flavor and color, you can experiment with other cherry varieties like Bing cherries. Just keep in mind that they may alter the taste and appearance slightly.
How long does Vintage Maraschino Cherry Cake last?
When stored properly, this Vintage Maraschino Cherry Cake can last for up to 3 days at room temperature or up to a week if refrigerated. For longer storage, consider freezing it for up to 3 months.
What should I serve with my Vintage Maraschino Cherry Cake?
This delightful cake pairs wonderfully with whipped cream or a scoop of vanilla ice cream. Fresh berries also make a lovely accompaniment!
Can I make this cake gluten-free?
Yes! You can substitute the all-purpose flour with a gluten-free flour blend. Be sure to check that all other ingredients are also gluten-free.
Final Thoughts
I hope you find joy in making this Vintage Maraschino Cherry Cake as much as I do! It’s more than just a dessert; it’s a slice of nostalgia that brings smiles and sweet moments. Enjoy every bite, and don’t hesitate to share your baking adventures with friends and family. Happy baking!
Vintage Maraschino Cherry Cake
Indulge in the delightful nostalgia of Vintage Maraschino Cherry Cake, a delightful dessert that brings a burst of flavor and a splash of color to any gathering. With its soft pink hue and sweet maraschino cherry bursts, this cake is perfect for birthdays, family gatherings, or simply as a cozy treat after dinner. Easy to make and visually appealing, it combines simple ingredients into an impressive dessert that will quickly become a household favorite. Each slice promises to evoke fond memories while delighting your taste buds.
- Prep Time: 20 minutes
- Cook Time: 30 minutes
- Total Time: 50 minutes
- Yield: Serves approximately 12 slices 1x
- Category: Dessert
- Method: Baking
- Cuisine: American
Ingredients
- 2 ½ cups all-purpose flour
- 2 ½ teaspoons baking powder
- ½ teaspoon salt
- ¾ cup unsalted butter, softened
- 1 ¾ cups granulated sugar
- 4 large eggs
- ½ cup maraschino cherry juice
- ½ cup milk
- 2 teaspoons vanilla extract
- ¾ cup maraschino cherries, chopped
Instructions
- Preheat oven to 350°F (175°C). Grease and flour two 9-inch round cake pans.
- In a medium bowl, whisk together flour, baking powder, and salt; set aside.
- In a large mixing bowl, cream softened butter and granulated sugar until light and fluffy.
- Beat in eggs one at a time; then mix in vanilla extract and maraschino cherry juice.
- Gradually add dry ingredients alternately with milk until just combined.
- Fold in chopped maraschino cherries gently.
- Divide batter between prepared pans and bake for 25-30 minutes or until a toothpick comes out clean.
- Cool cakes in pans for 10 minutes before transferring to wire racks to cool completely.
Nutrition
- Serving Size: 1 slice (100g)
- Calories: 350
- Sugar: 30g
- Sodium: 180mg
- Fat: 14g
- Saturated Fat: 8g
- Unsaturated Fat: 5g
- Trans Fat: 0g
- Carbohydrates: 51g
- Fiber: 1g
- Protein: 4g
- Cholesterol: 60mg